Overview
The Content Modeler lets you add your own custom taxonomies in addition to the default ones that come with CoreResources. To learn more about the default taxonomies, read the documentation on Standard Taxonomies here.
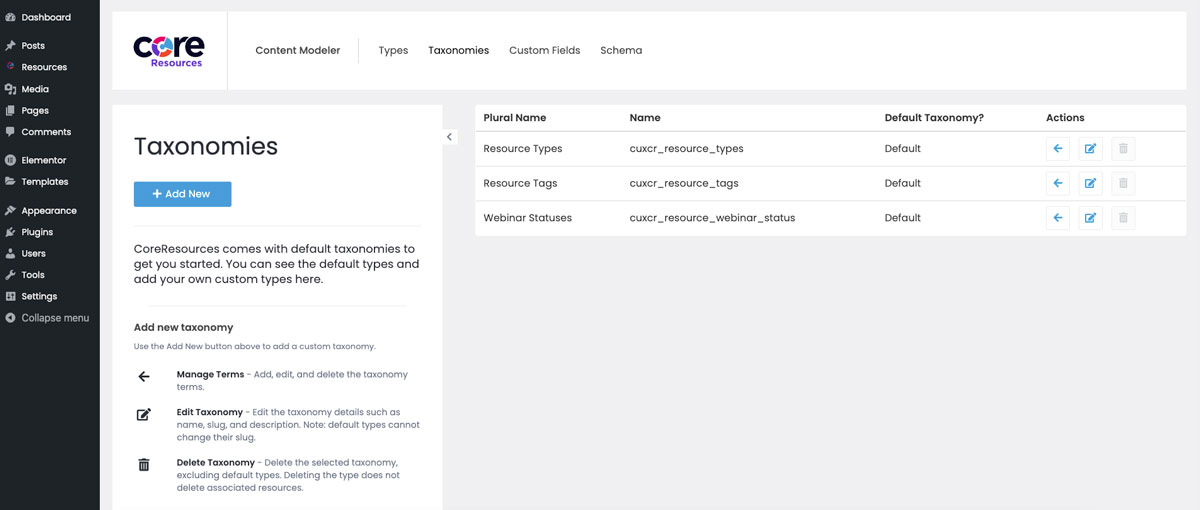
List View
To see all of your current Taxonomies, go into the backend of your site and click the Content Modeler link in the left admin menu, then click into the Taxonomies tab. You will see a list of all the taxonomies with the following information:
- Plural Name – the plural version of the name of your taxonomy
- Name – the unique identifier name of your taxonomy. You cannot change this after you create your custom taxonomy.
- Default Taxonomy – labels the taxonomy as default (comes with CoreResources) or a custom taxonomy that you have added within the Content Modeler or via code
- Actions – Manage, edit, or delete terms. Note you cannot delete default taxonomies.
Add New
On the list view of Taxonomies, click the “Add New” button at the top to be given a screen with the following fields to fill out:
- Singular Name – the singular version of your taxonomy – this can be changed later. The name must be unique.
- Plural Name – the plural version of your taxonomy – this can be changed later. The name must be unique.
- Taxonomy Name – this will auto-populate when you type into the Plural Name field. You cannot use the same name as an existing taxonomy and you cannot change this once you create the taxonomy.
- Field Type – The field type you would like in the backend of the Add/Edit Resources view when selecting a taxonomy. The options are Select Advanced, Select, Checkbox List, Radio List.

Taxonomy field types in order from top to bottom: Select, Checkbox List, Radio List. - Public – whether this taxonomy will have public-facing term pages. If you are integrating your resources with the FacetWP plugin for filtering, it is recommended to set this to No to avoid duplicate content issue for SEO.

Once you properly fill out the fields, press “Create” at the bottom. As long as there were no issues with your chosen names, you will receive a success message and your new taxonomy will now be available for use.
Editing a Taxonomy
When viewing the list of Taxonomy, the Actions column contains an Edit icon – it is the 2nd icon in the list. Click the icon for the Taxonomy you would like to edit.
Once you are taken to the edit screen, you will see it is very similar to the Add New screen except it will be pre-populated with the current Taxonomy’s information. You can edit these fields as desired except for a few rules:
- You cannot change the Taxonomy Name once a taxonomy is created.
- As with adding a new taxonomy, if you edit a taxonomy you must give it a unique singular name and plural name – nothing can share these same values.
Once you have made your changes, click the “Save Changes” button on the bottom. Your changes will now be reflected in the backend and frontend.
Managing Terms
Once you create a taxonomy within the Content Modeler, the taxonomy terms are going to be managed via the standard WordPress method. See our documentation on managing taxonomy terms for full details.
Deleting a Taxonomy
Just like with editing a taxonomy, check the Actions columns of the list view – the 3rd icon is the Delete icon.
When clicking to delete a taxonomy, you will be asked to confirm that you want to delete it. Be sure you want to delete.
Before deleting one, understand how deletion works:
- Default taxonomies cannot be deleted
- Any Resources that were using this taxonomies will not be deleted. Instead, any terms that were set on them for this taxonomy will become blank and any associated field to this taxonomy will be gone from the backend.
- If you had this taxonomy integrated with FacetWP filtering, you will need to manually remove your filter from the page it existed on to avoid potential problems.
Make sure you know what you are doing before deleting something. It is always a good idea to backup your website before deleting something in case it creates issues.