The new CoreResources dashboard contains quick access to your resources management tools and settings. From here you can get an overview of your latest resources, modify your global resource settings, and create new resources, resource types, taxonomies, or field groups Settings On the left side of the dashboard is the settings management. The settings are […]
Page Type: Article
Scribe
Resources with Filter Bar
The Resources with Filter Bar Widget is a post grid widget for your resources that includes simple filtering. This widget does not require any additional plugins or widgets. It allows you to choose which resources you want to display and then filter them by resource type. Content Tab Controls Content Controls Layout Columns – number […]
Image & Icon Box Widgets: How To’s
What is an Image/Icon Box Widget in Elementor? The Image Box and Icon Box Widgets let you add a widget that combines an image/icon with a corresponding headline and description. The difference between an Image Box widget and an Icon Box widget is that one uses an image from your media library, while the other […]
Flip Box Widget: How To’s
What is the Flip Box widget in Elementor? The Flip Box widget in Elementor helps you create animated boxes that flip from the front side to the back side once users hover over the widgets. This widget makes your content more interesting with an interactive before and after effect. Each side of the flipbox widget […]
Popups: How to Turn On/Off
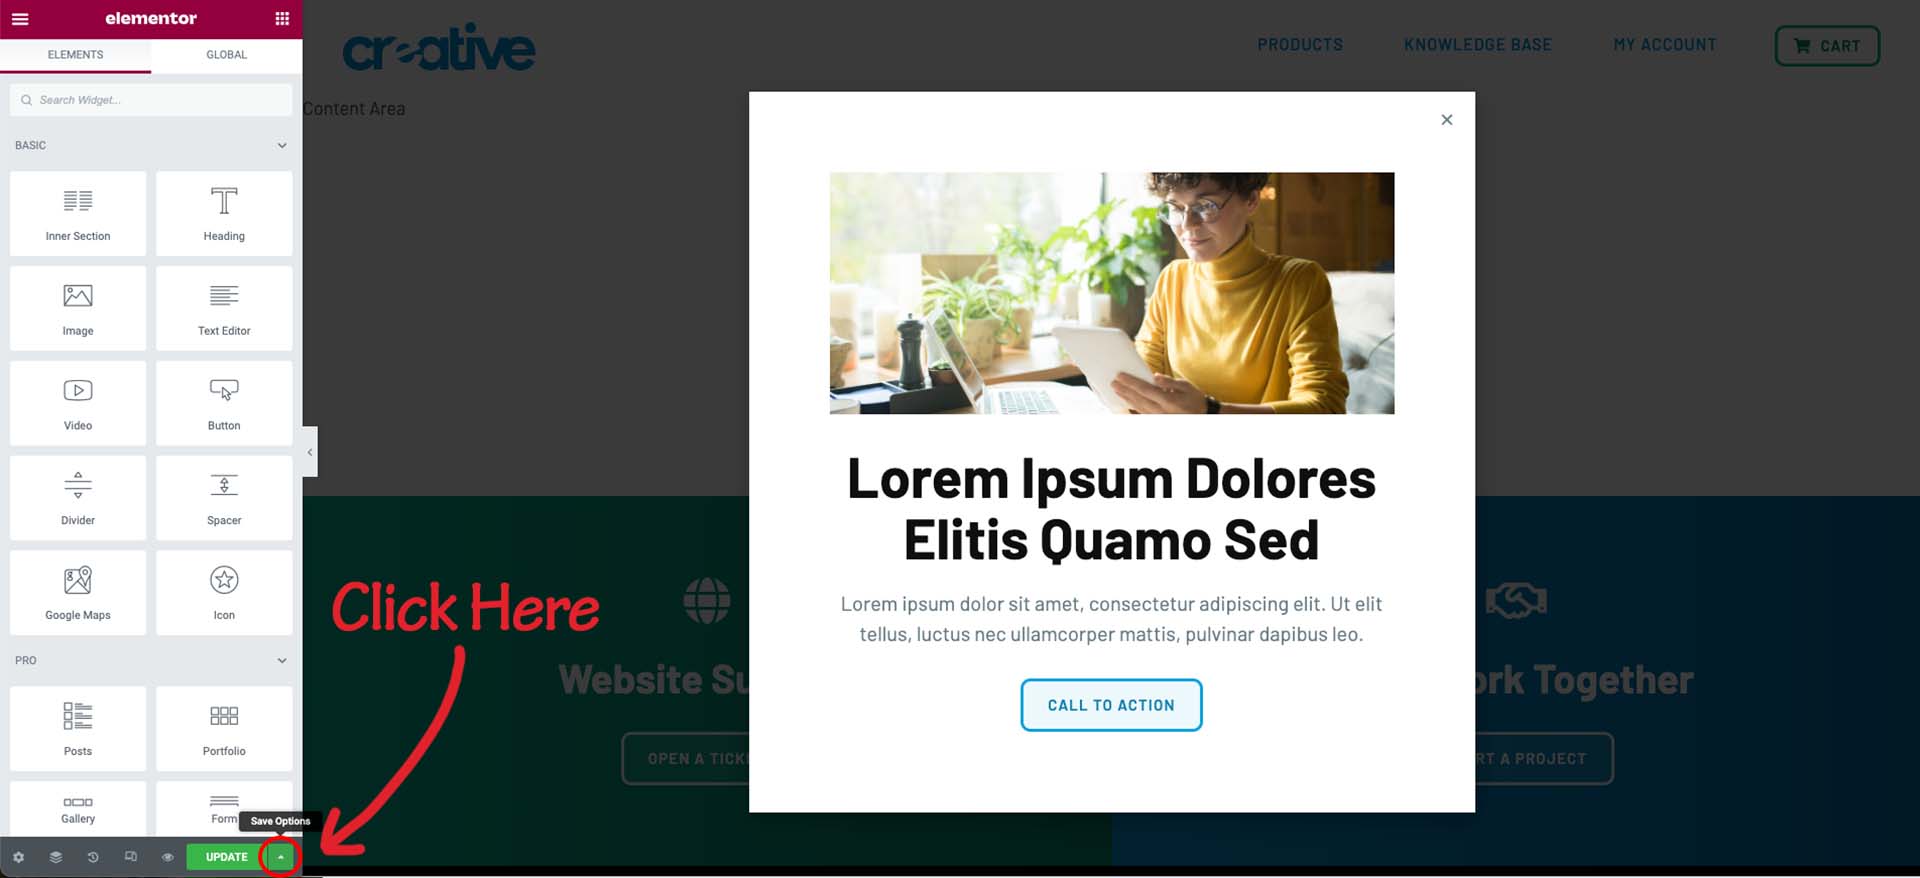
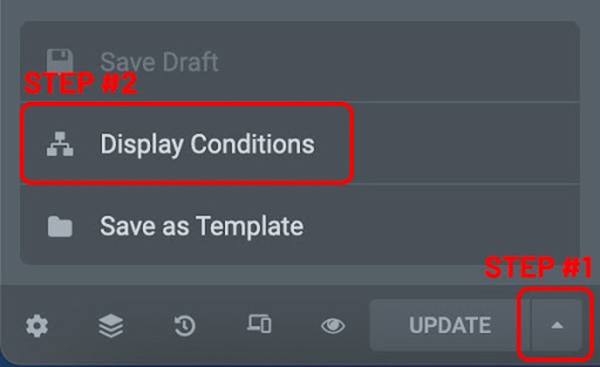
How do I Turn On Popup display conditions? To get started in the WordPress dashboard, navigate to “Templates>>Popups” in the left side panel. From here hover over the popup you want to display on the website and click “Edit with Elementor”. This will load the popup into the Elementor page editor. Once you are in […]
Page Metadata: Definition & How-To’s
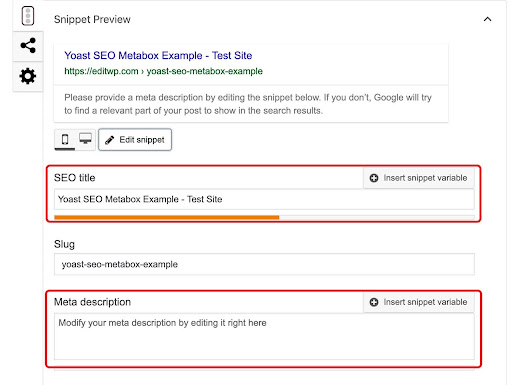
What is page Metadata? Consisting of a web page’s title and description, metadata in the most simple terms is “data about data”. The page title and page description information are encoded into the page, but are not actually visible on the website. Why is Metadata so important for my website? Simply put, SEO (search engine […]
Global Sections with Elementor: How-To’s
What are Global Sections with Elementor? Global sections with Elementor allow you to save complete sections, and re-use that section on different pages of the website. The website’s header, footer, and global call-to-action are examples of global sections used on your website. Using dynamic tags, we can choose specific pages on the website to display […]
Testimonial Slider widget: How-To’s
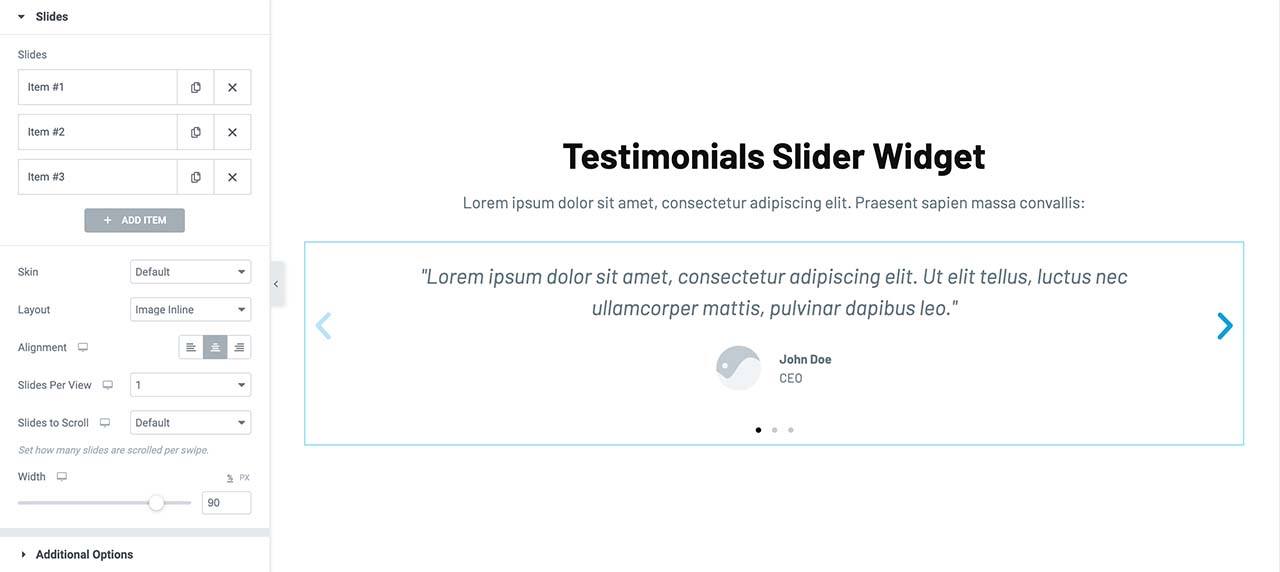
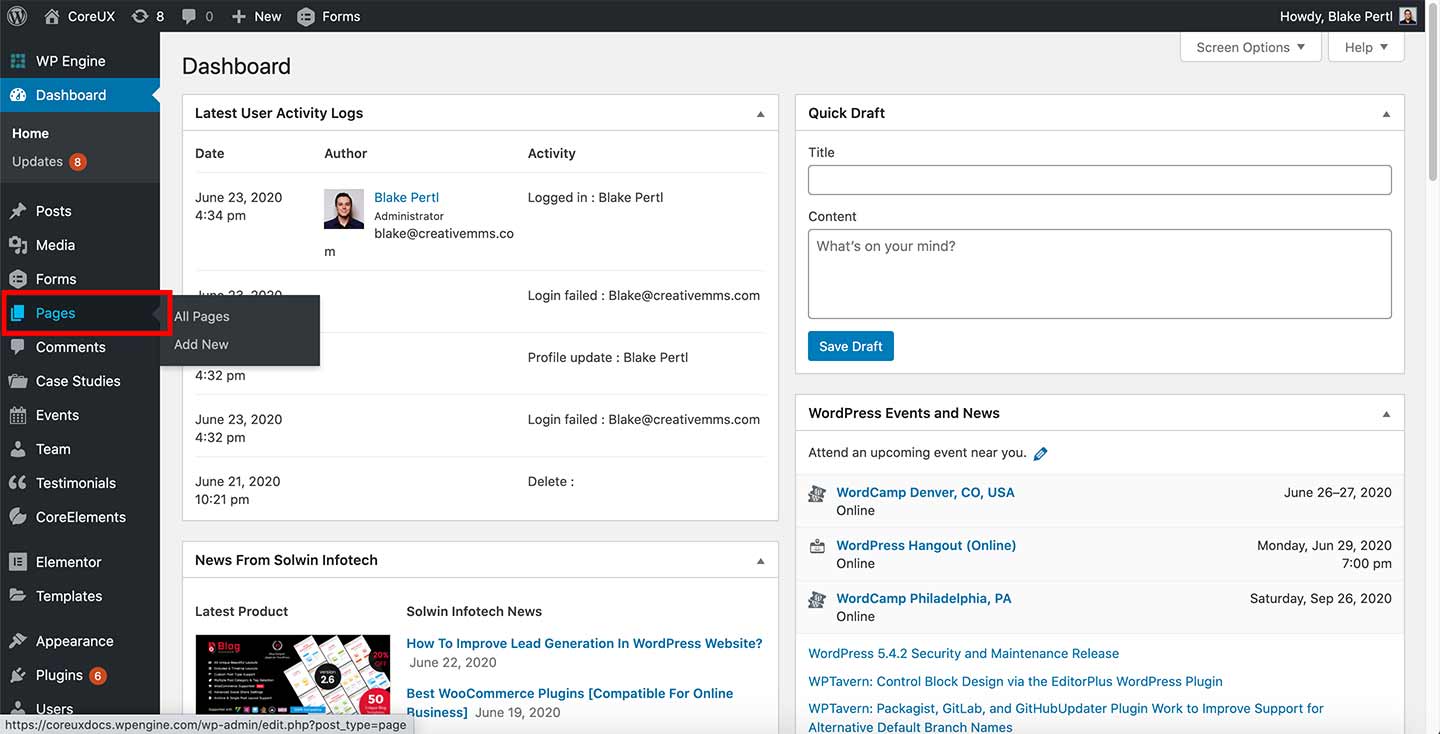
How to Add a new Testimonial slide To get started in the WordPress dashboard, navigate to the “Pages” section in the left side panel. In the “Pages” section, hover over the page you want to update and click the “Edit with Elementor” button. This will load the page into the Elementor editor view. Once you […]
Icon List Widget: How To’s
What is the Icon List widget in Elementor? The Icon List widget in Elementor creates an easy-to-manage list of items (can be vertical or horizontal), with each item highlighted by its own icon and title. Each list item can also be linked up to a page on your website or a third party link. How […]
How to Edit Button Links with Elementor
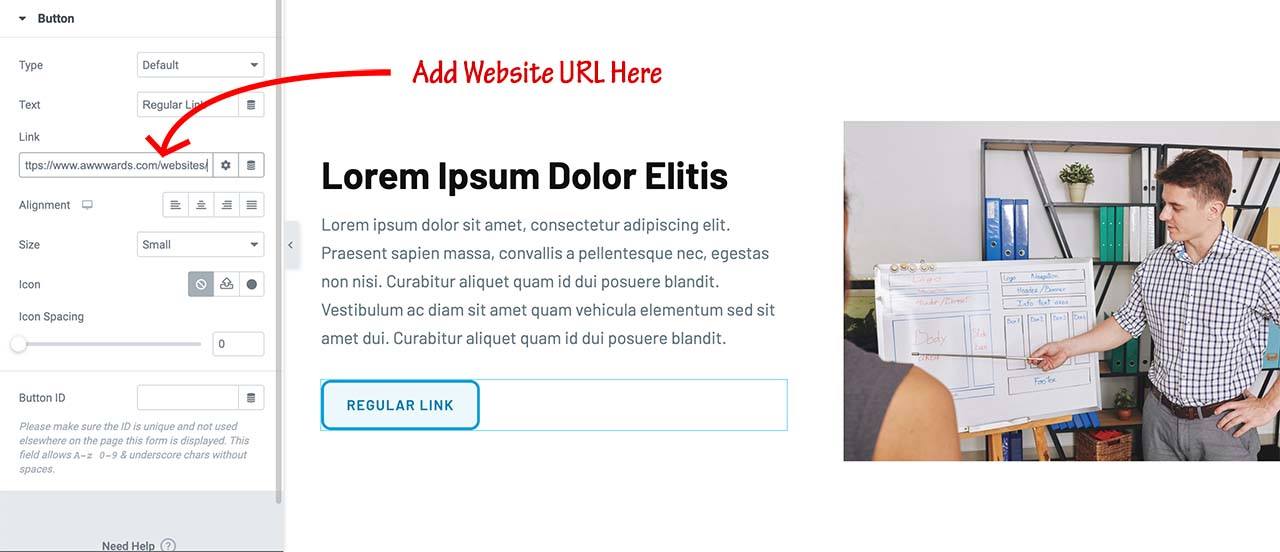
How to edit Standard Button Links To get started from the WordPress dashboard, navigate to the “Pages” section in the left side panel. In the “Pages” section, hover over the page you want to update and click the “Edit with Elementor” button. This will load the page into the Elementor editor view. Next click on […]
How to Edit Images with Elementor
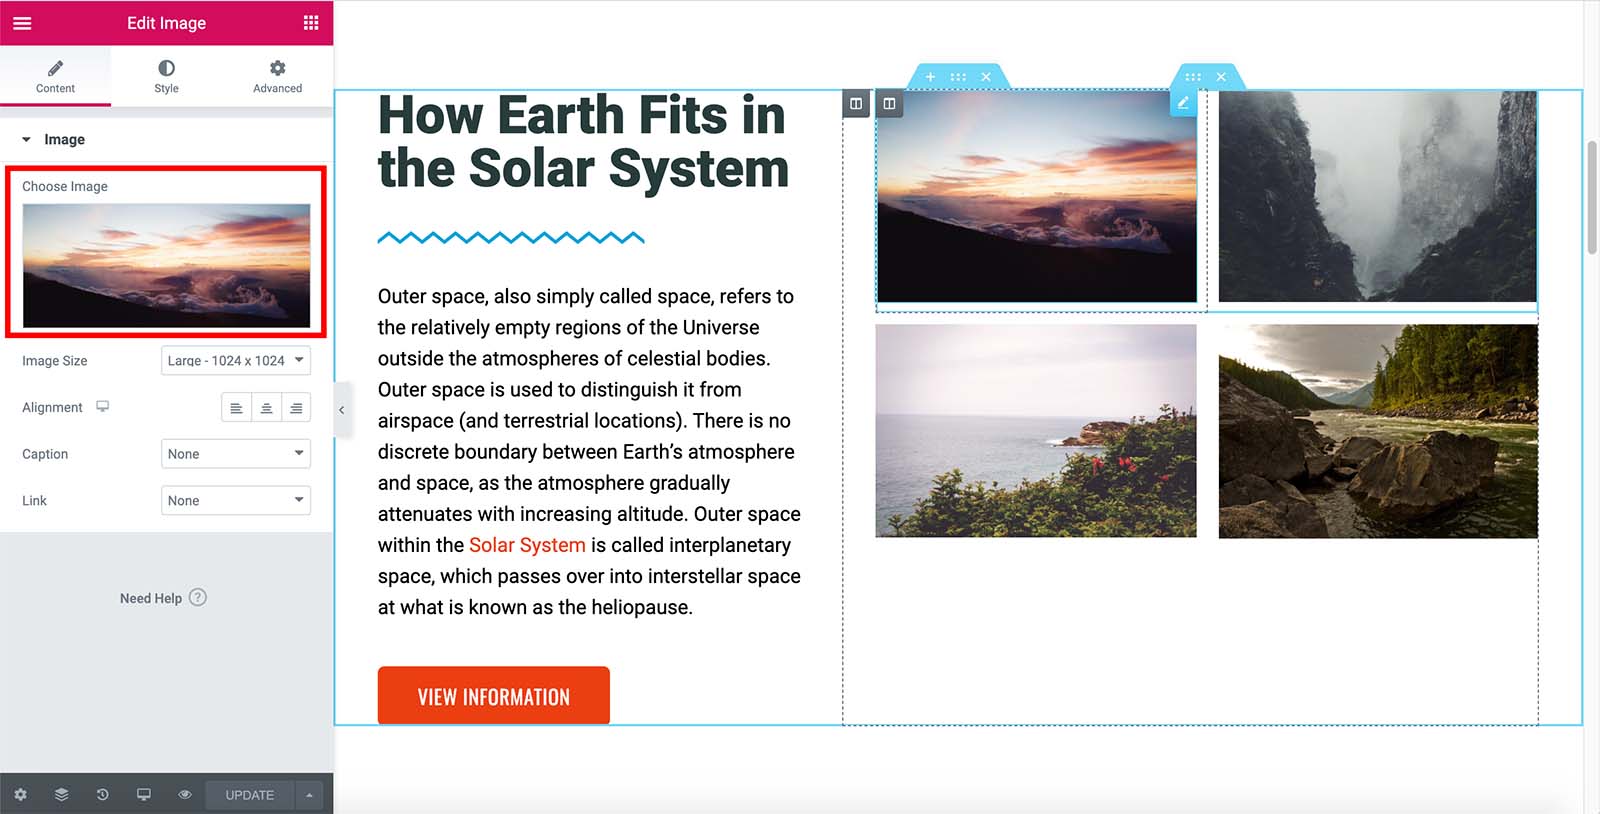
How to edit Inline Images To get started from the WordPress dashboard, navigate to the “Pages” section in the left side panel. In the “Pages” section, hover over the page you want to update and click the “Edit with Elementor” button. This will load the page into the Elementor editor view. Once you are in […]
How to Edit Text with Elementor
How to edit Text and Headlines To get started from the WordPress dashboard, navigate to the “Pages” section in the left side panel. In the “Pages” section, hover over the page you want to update and click the “Edit with Elementor” button. This will load the page into the Elementor editor view. Once you are […]
FTP Access
Your website’s hosting provider is the service providing the server space where your site’s files are stored, allowing them to be accessed on the internet. Most web hosts (such as Dream Host, GoDaddy, etc.) provide you FTP information after you’ve signed up for a webhosting package. This is the information we need to make changes […]
Add Account Users in WordPress
There are several different Content Management Systems (CMS’s) available: WordPress (most common) Joomla Drupal Magento OsCommerce Custom CMS that was developed specifically for your site The majority of these systems have different roles which indicate the type of access that can be granted. To be the most effective partner in supporting your website, CreativeMMS will […]
Sharing DNS Access
Your website’s domain (i.e. yourdomain.com) is registered through a third party provider called a DNS. Often this is the same as where your site was originally hosted. Most web hosts (BlueHost, GoDaddy, etc.) provide domains. If your project with CreativeMMS includes launching a new website or managing your domain, we will need login credentials to […]
My icons are broken after I updated to CoreElements 1.2.4. How can I fix them?
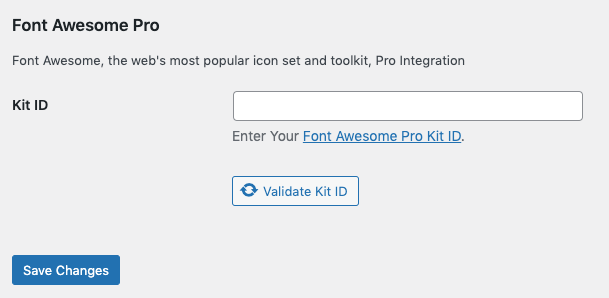
In version 1.2.4 of CoreElements, support for FontAwesome PRO was discontinued. If you are using any FontAwesome PRO icons in your site, they will need to be updated. We will walk you through how to do that here. First, you will need to remove the FontAwesome Pro ID from the Elementor integration tab. You can […]
Image Alt. Tags: How To’s & Tips
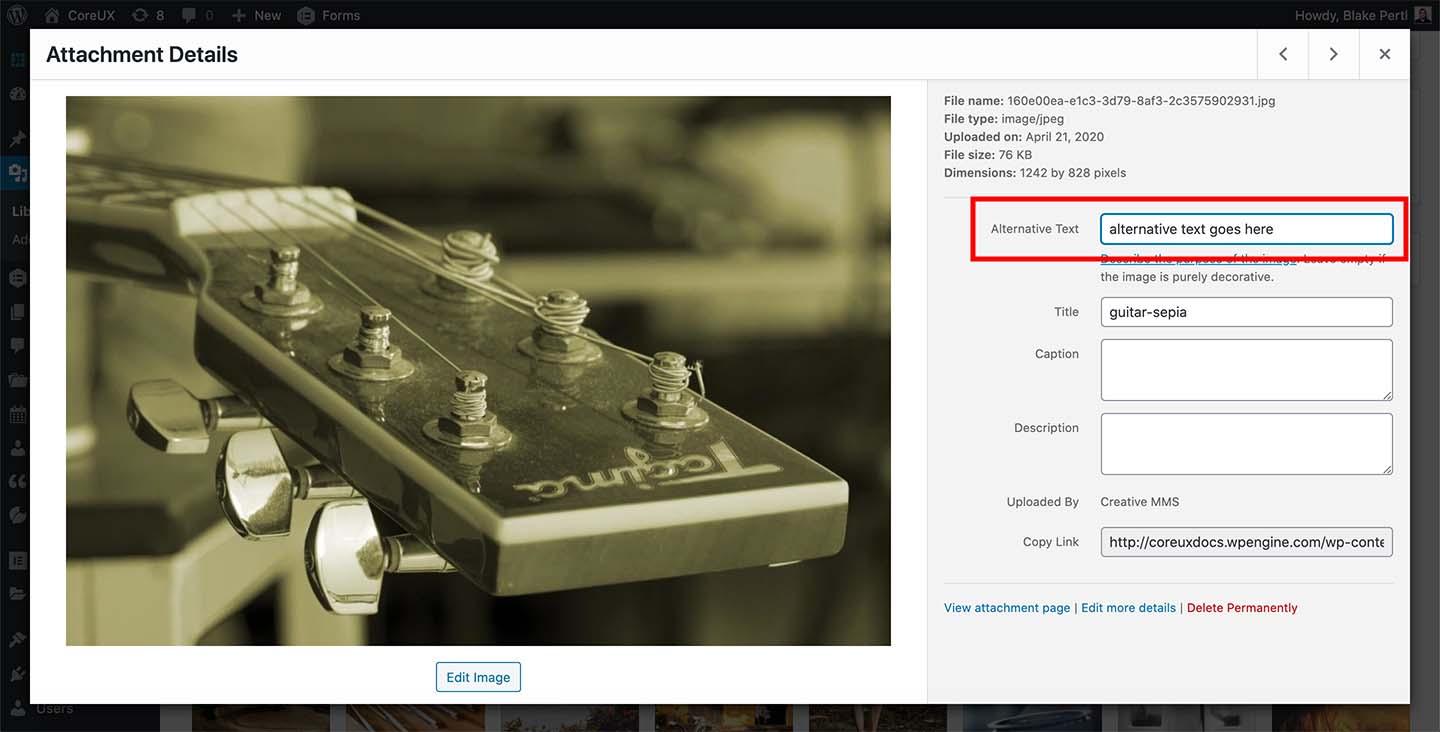
What is an Image Alt. Tag? Image Alt. tags are “alternative text ” for an image. Alt. tags are used to describe the image or what the image is representing. One of the main purposes of Alt. tags is for the benefit of visually impaired users who use screen readers when browsing. As with many […]
License
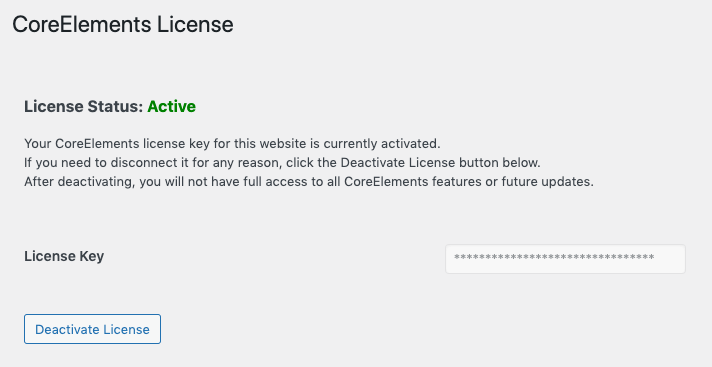
By activating your CoreUX and CoreElements licenses you will automatically receive updates. Licenses can be purchased, renewed and managed at my.creativemms.com. CoreElements Navigate to the CoreElements License screen. You can find it under CoreElements » License. Enter your license key and click the Activate License button. CoreUX Navigate to the CoreUX License screen. You can […]
Installation

There are two ways to install CoreElements and CoreUX. Manually Through Dashboard Download the CoreElements plugin and CoreUX theme (zip-files) from your account page (learn more here). CoreElements: Under Plugins, click the “Add New” submenu. CoreUX: Under Appearance, click Themes, then click the “Add New” button. Click “Upload plugins” / “Upload themes”. Select the appropriate […]
How to Add, Edit and Delete Users in WordPress
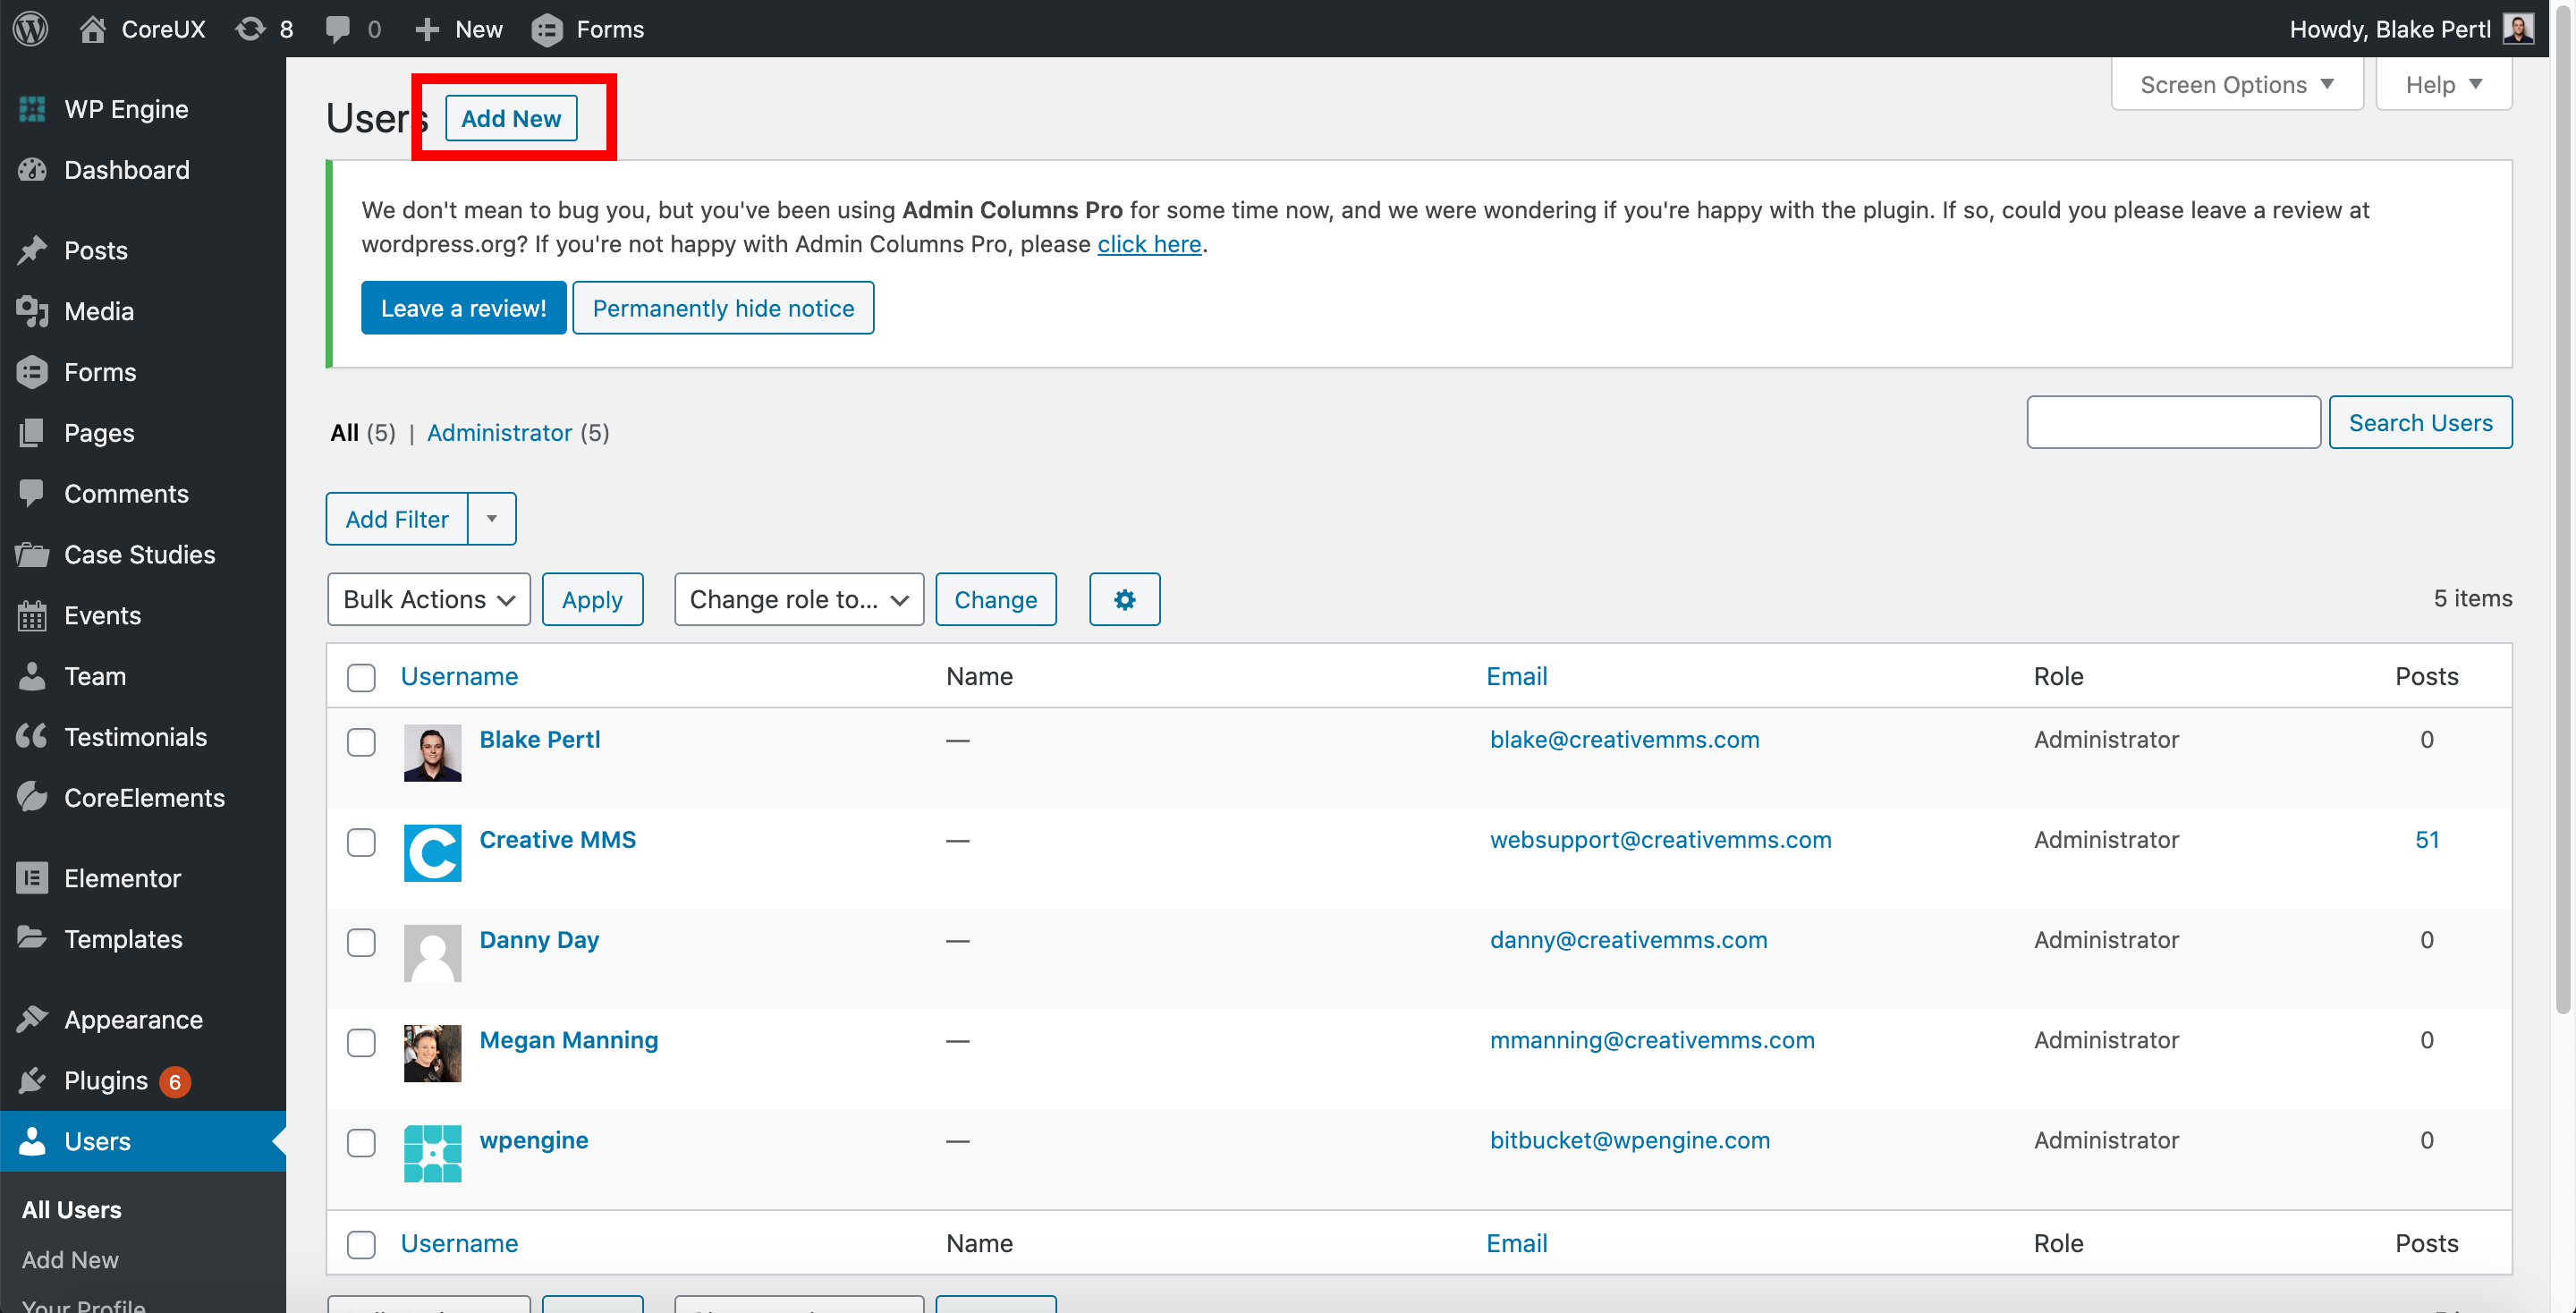
WordPress documentation: https://wordpress.com/support/user-roles/ How to Add Users To get started, navigate to “Users” in the WordPress dashboard. In the “Users” section, click the “Add New” button. This will load a new screen. The next step is to fill in the fields with the new user’s information. After you have finished adding the new user’s information, save […]
How to Edit Website Menus
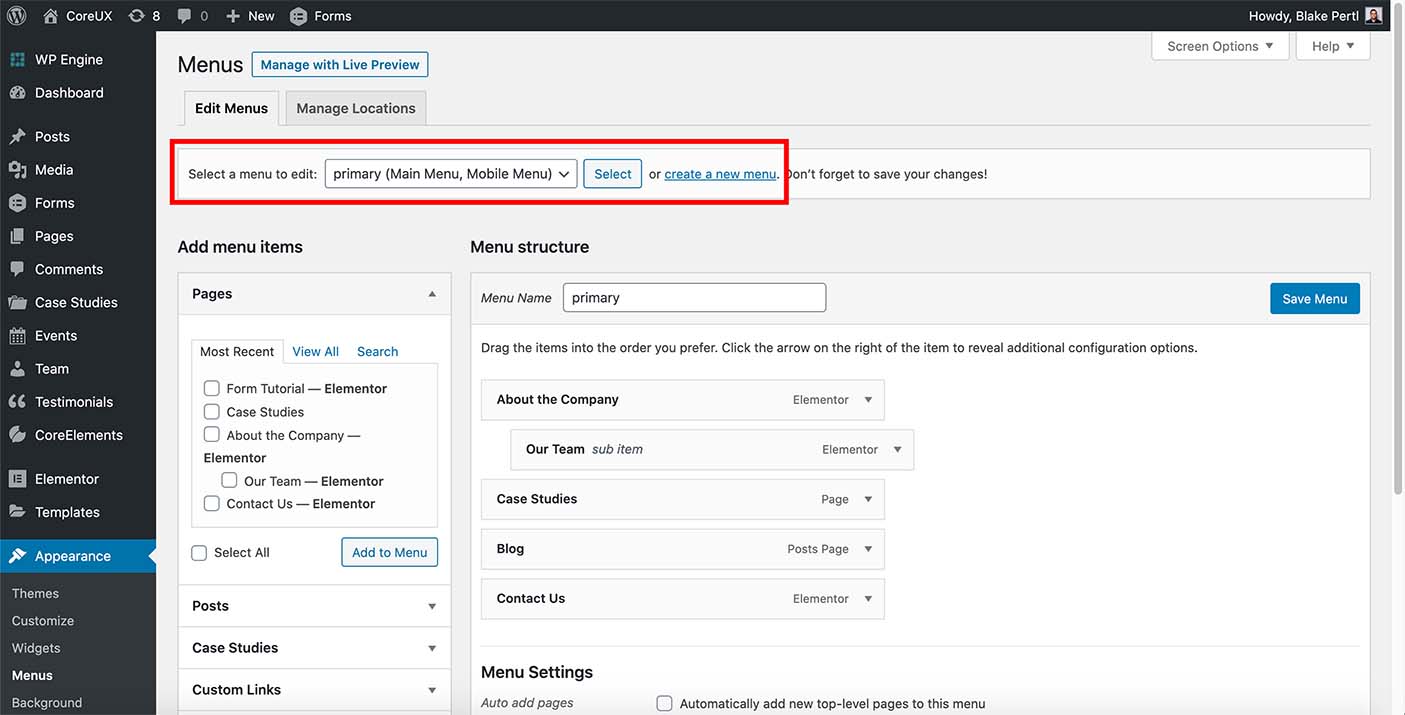
To get started from the WordPress dashboard, navigate to “Appearance”>>“Menus” in the left side panel. Select the menu you want to edit by clicking on the “Select a menu to edit” dropdown and clicking on the menu name. From here, you can edit menu items, add new menu items, remove existing menu items, and reorder […]
How to edit Image ALT Tags
What is an image alt tag? ALT tags are “alternative text ” for an image. ALT tags are used to describe the image or what the image is representing. One of the main purposes of ALT tags is for the benefit of visually impaired users who use screen readers when browsing. As with many website […]
How to Add, Edit and Delete Media Files

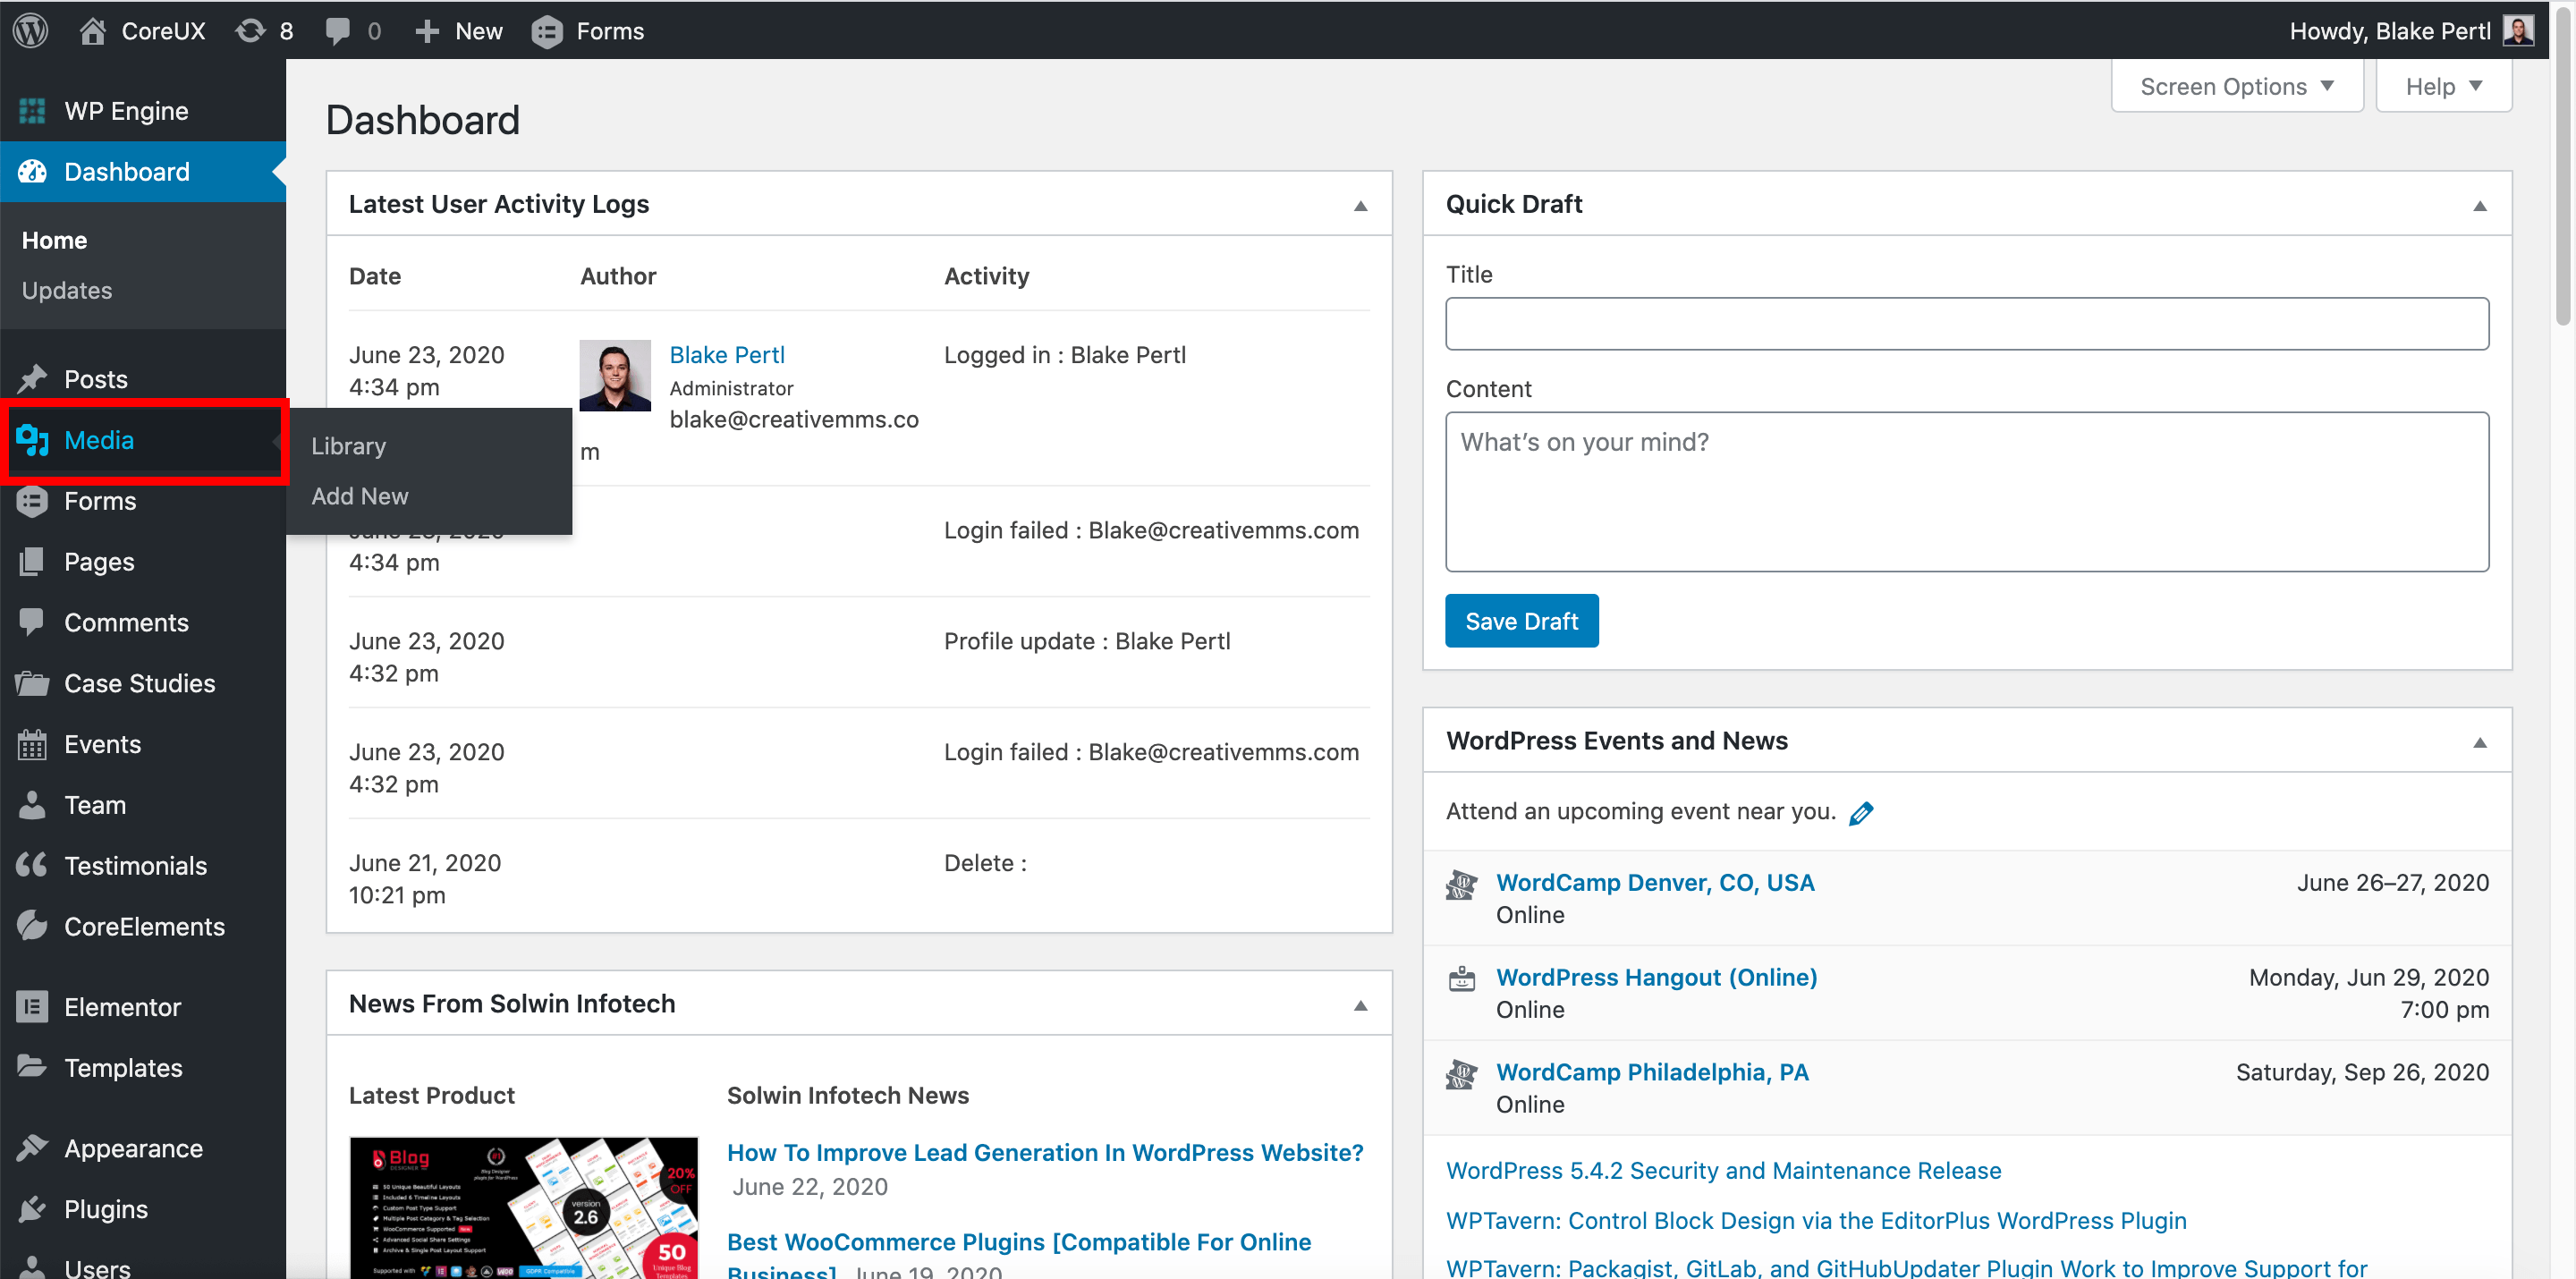
How to ADD new Image/Video Files: Navigate to the “Media” section in the WordPress dashboard. To upload a new image or video file click on the “Add New” button in the top left. You have the ability to drag and drop media files into WordPress, or click on the “Select Files” button which will open […]
Images for the Web: Dimensions & File Size Tips
On your website, images are an invaluable way to convey all kinds of information to your users*. Choosing the right images is an important step in styling your website. Choosing the correct sizes, file types, and export settings are imperative to making your site look sleek and professional, all while keeping load times to a […]
Exporting Images for Your Website: Photoshop Tips
Choosing the correct Photoshop export settings is imperative to making images on your site look sleek and professional, all while keeping load times to a minimum. Here is quick how-to guide for exporting for web in Photoshop, as well as some tips for keeping your images small in size, but big in visual impact. How […]
How to Upload Images & Videos to Your Website
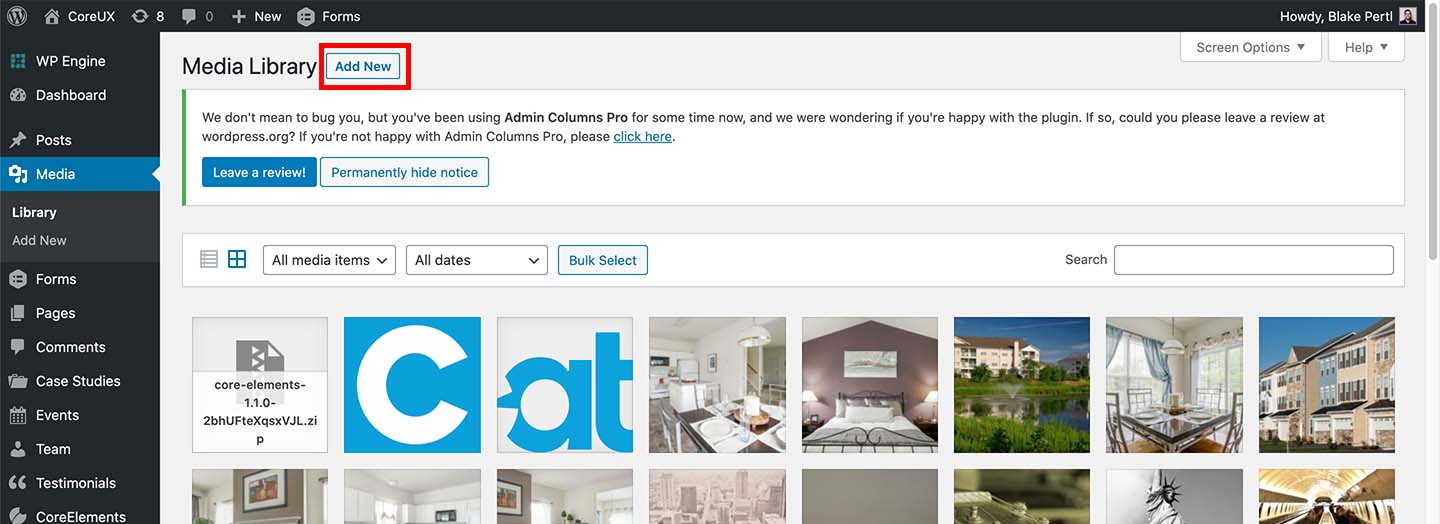
How to Add new Image/Video Files: To get started in the WordPress dashboard, click on the “Media” section in the left side panel. To upload a new image or video file click on the “Add New” button in the top left. You have the ability to drag and drop media files into WordPress, or click […]
Web Image Terms & Definitions
Pixels Pixels (px) are the smallest pieces of information in a photograph; tiny dots that when viewed from a distance, create one cohesive image. Image Size/Dimensions Image size is expressed in pixel dimensions: width x height. File Size (disk space) File size refers to the amount of space a file takes up on a storage […]
Cancel a Subscription
As your trusted partner, we want to provide a seamless, stress-free hosting platform to keep your site up and running. If at any time your needs change, we want to make sure you have everything you need to make your hosting transition as smooth as possible. You can cancel your hosting subscription at any time […]
Schema Overview
What is it? Schema, or structured data, is passed to search engines to give context to what kind of content is on a particular post or page. Google defines it as “a standardized format for providing information about a page and classifying the page content.” Why is it important? This is important because it means […]
Editing Global Schema Settings
Accessing the settings page To start using Schema on your Resources, hover over ‘Resources’ on the left sidebar and click on ‘Dashboard.’ From the dashboard you will see a settings panel, click on ‘Schema Settings.’ The first thing you will want to do is make sure the ‘Enable Schema?’ toggle is switched to ‘YES.’ Once […]
Previewing / customizing schema for individual posts
Once you are satisfied with your settings, you will likely want to see what the output will look like. We got you! On the edit screen of each resource post, in the starting ‘Resources’ content block, there is a tab called ‘Schema.’ Here is where you will be able to preview the schema as it […]
Adding Schema to Elementor Pages/Templates
After all the schema settings have been hashed out and properly configured, they need to go somewhere! We made this super easy for y’all. When creating a Single template for any or all Resource Types in Elementor, scroll to the ‘Core Resources’ section of widgets. Find the one called ‘Resource Schema.’ Drag it onto […]
Taxonomies
Overview The Content Modeler lets you add your own custom taxonomies in addition to the default ones that come with CoreResources. To learn more about the default taxonomies, read the documentation on Standard Taxonomies here. List View To see all of your current Taxonomies, go into the backend of your site and click the Content […]
Field Builder
Overview The Field Builder allows the creation of custom fields for Resources. You can create custom field groups for your custom resource types as well as for the default resource types. List View To see all of your current Field Groups, go into the backend of your site and click the Data Manager link in […]
Field Types
Overview In the current Content Modeler, you can only create fields using these provided field types: Text – A basic text field. This does not allow line breaks within the field. Textarea – A basic textarea meant for longer content. This supports line breaks within the field. Image Upload – A single image field. This […]
Standard Taxonomies
Overview CoreResources comes with a few default taxonomies. A taxonomy is a way of grouping resources together based on a specific criteria. Each taxonomy is able to have its own terms, which are the different selections for grouping. These allow you to categorize and filter your resources content by those specific terms. For example, if […]
Custom Taxonomies
Overview If you need to categorize your Resources content by more than the provided default taxonomies, custom taxonomies can be created. Content Modeler With CoreResources’s Content Modeler functionality, anyone can easily add their own custom taxonomies to their Resources and add custom terms. See the Content Modeler Taxonomy section for full details on how to […]
Content Modeler Overview
Overview The Content Modeler is a new backend tool to help you easily customize your Resource center without needing the help of a developer. Currently the Content Modeler allows the adding, editing, and deleting of the following 3 things: Resource Types – the backbone of your Resource center holding all the different types of resources […]
Downloading Your Products
Downloading your new CoreUX theme and CoreElements plugin have never been easier thanks to the new Marketplace on my.creativemms.com. Checking Out To download CoreUX and CoreElements, visit the product page here, and click the ‘Add to Cart’ button. Then click ‘Checkout’ when ready. If you are a returning customer to the Creative Marketplace, go ahead […]
Manually Update a WordPress Theme
A common procedure in managing a WordPress site is having to update your theme and plugins. If you are using a theme installed via WordPress.org’s collection of free themes, WordPress can automatically alert you to an available update for your theme and easily update it for you with the click of a button. In the […]
Manually Update a WordPress Plugin
A common procedure in managing a WordPress site is having to update your theme and plugins. If you are using a plugin installed via WordPress.org’s collection of free plugins, WordPress can automatically alert you to an available update for your plugins and easily update them for you with the click of a button. In the […]
Managing Taxonomy Terms
Overview Managing taxonomy terms can differ depending on the taxonomy in question. Resource Types and Webinar Status have their own set of rules, while Resource Tags and any custom taxonomies may not work the same way. Read on below for more details into each type. Resource Types To manage your Resource Types, see the Content […]
Resource Types
Overview Resource Types are the backbone of the Resource center, as much of the system’s functionality is built upon them. For full details on Resource Types before learning how to manage them inside the Content Modeler, read the Resource Types documentation here. List View To see all of your current Resource Types, go into the […]
Schema Settings for Each Resource Type
Default settings for all Resource Types Aside from the global settings, each resource type can be customized to use Resource Fields unique to that Resource Type for Schema Fields unique to the Schema Type that is associated with it. Before we dive into that (more in Part c!), there are certain field pairs that each […]
Add Users to your LinkedIn Campaign Manager Account
LinkedIn Campaign Manager is used to manage paid social ads and campaigns on LinkedIn. CreativeMMS will let you know the users who need access to your Campaign Manager account. Prior to adding us as administrators to your LinkedIn Campaign Manager account, we will need to (individually) follow your account on LinkedIn. From your LinkedIn Campaign […]
Add Users to your Facebook Business Manager Account
Facebook Business Manager is used to manage paid social ads and campaigns on Facebook and Instagram. CreativeMMS will provide the email addresses of any users from our team who need access to your Business Manager account. To add users, follow the steps outlined here How to Add People to Your Facebook Business Manager To give […]
Add Users to your Google Ads Account
Payment Information For each of the paid platforms utilized, we will need to ensure payment information is correct to launch. Typically we will capture this information from you via a phone call to set up accounts, but if you already have accounts created please validate you have up-to-date payment information in place. Credit Card Information […]
Add Users to Your Google My Business Account
Google My Business is used to display your business information in search listings and can improve visibility and get your customers information faster. It is an important tool in your digital marketing toolbox. To share access to Google My Business with your digital marketing agency partner, follow the steps below: Sign in to Google My […]
Add Users to Google Search Console
Google Search Console is used to track how your site is performing in organic search, and is an important tool in your digital marketing toolbox. To share access to Google Search Console with your digital marketing agency partner, follow the steps below: Sign in to Google Search Console. This requires an existing Google Analytics property […]
Add Users to Your Google Analytics Account
Google Analytics is used to track website traffic and performance, and is an important tool in your digital marketing toolbox. To share access to Google Analytics with your digital marketing agency partner, follow the steps below: Sign in to Google Analytics. This requires an existing Google Analytics property associated with a Google Account If you […]
Coming Soon
This content is restricted to buyers of CoreElements. Log into Your Account Username or Email Password Remember Me Lost Password?
Coming Soon
We’re working on WordPress, Elementor and CoreElements training to help empower you with our partnership. Stay tuned.
Coming Soon
Stay tuned. We’re working on some amazing guides and how-to’s to help your digital marketing strategy and journey.
Coming Soon
We’re working on WordPress, Elementor and CoreElements training to help empower you with our partnership. Stay tuned.
Coming Soon
Stay tuned. We’re working on some amazing guides and how-to’s to help your digital marketing strategy and journey.
Blog Posts (How to View All/Add/Edit/Delete)
Overview To get started, from the WordPress dashboard navigate to the “Posts” section (https://prnt.sc/t9b3m7). How to Add a new blog post In the Posts section, click the “Add New” button (https://prnt.sc/t9b49d). This will load a new screen. From here you want to fill in the new blog post’s content into the appropriate input fields (https://prnt.sc/t9b55o). […]
Requirements
CoreResources requires your server to be installed with the following: Server Requirements PHP version 7.0.0 An updated WordPress installation Although CoreResources will run on PHP 7.0.0, we recommend at least PHP 7.2 or greater. Upgrading PHP If your server does not meet the PHP requirement of CoreResources, you should probably upgrade your PHP version. You […]
License
By activating your CoreResources license you will automatically receive updates for CoreResources. Licenses can be purchased, renewed and managed at my.creativemms.com. Navigate to the CoreResources License screen. You can find it under Resources » CoreResources License. Enter your license key and click the Activate License button.
Installation
There are two ways to install CoreResources. Manually through Dashboard Download the CoreResources plugin (zip-file) from your account page Under Plugins, click the “Add New” submenu Click “Upload plugins” Select the CoreResources zip-file you downloaded and click “Install now” After installation, you will find a new menu item called CoreResources. Manually through FTP Download the […]
Elementor Layouts Overview
Getting Started Elementor Templates are an essential building block for your Resource Center. You can style your entire Resource Center just by utilizing three various types of templates – archive, category archive, and single post. In this article, we will go over how to set up an archive page for a specific Resource Type. This […]
Resource Type Single
Getting Started Elementor Templates are an essential building block for your Resource Center. You can style your entire Resource Center just by utilizing three various types of templates – archive, category archive, and single post. In this article, we will go over how to set up a single post template for your Resource Posts, or […]
Resource Type Archive
Getting Started Elementor Templates are an essential building block for your Resource Center. You can style your entire Resource Center just by utilizing three various types of templates – archive, category archive, and single post. In this article, we will go over how to set up an archive page for a specific Resource Type. This […]
Resource Archive
Getting Started Elementor Templates are an essential building block for your Resource Center. You can style your entire Resource Center just by utilizing three various types of templates – archive, category archive, and single post. In this article, we will go over how to set up the main Resource Archive. This is the page on […]
Standard Fields
Overview Standard resource type field set up the resources data. Standard Fields Title – Enter the title of the resource Featured Image – Add a featured image for the resource. The featured image can be shown as a thumbnail and also on the single resource page Resource Data – This is the main resource fields […]
In the News
Overview In the News articles are meant for articles that have been published on websites other than your current website. Publications do not have single posts, instead the article is redirected to the publications website article. In the News Fields Publication Company – Enter the name of the Publication Company, ie. CNN Publication Date – […]
Podcasts
Overview The podcast resource allows you to enter your podcast embed script, podcast transcript and podcast length. Podcast Fields Podcast Embed – Enter the podcast embed from your podcast provider Podcast Transcript – Enter the podcast transcript if available. Podcast Length – Enter the podcast length. This can be displayed on the Elementor Resources widget […]
Videos
Video URL – Enter video embed url from YouTube or Vimeo. Video Transcript – Enter the video transcript if accable. Video Length – Enter the video length. This can be displayed on the Elementor Resources widget and Elementor Resources Detail widget
Webinars
Overview Webinars have two states; future webinars and past webinars. If your webinar is in the future enter a webinar registration url. This action displays a register CTA on the single webinar page allowing users to sign up for your webinar. When your webinar is over add a watch url to allow users to watch […]
Whitepapers
Overview A whitepaper is a persuasive, authoritative, in-depth report on a specific topic that presents a problem and provides a solution. CoreResources makes it easy to add non gated and gated whitepapers. Whitepaper Fields Whitepaper Date – Select the publish date of the whitepaper Whitepaper Download URL – Enter the download url for the white […]
Resources Grid
The Resources Grid widget is a flexible grid widget that can pull in the Resources post type content for use on the Resources archive page or any where else on the site thanks to the customizable query options. Skins The first thing to note about the Resources Grid widget is that it comes with 2 […]
Current Facet Filter
The Current Facet Filter widget works alongside the Resources Facet Filters widget. It allows you to pick one of the Facet Filters that you are using on the page to then display a separate message telling the user what filter they have currently chosen. Setup the Resources Facet Filters widget first, then drop this widget […]
FacetWP
Getting Started FacetWP is a WordPress plugin that provides the ability to easily set up customized filters for your content. CoreResources has built in support for FacetWP to integrate with the resource library on the front-end. To get started using FacetWP, first make sure FacetWP is installed in your site plugins. If you are using […]
Resource Facet Filters
The Resources Facet Filters widget is available when FacetWP is installed. It allows you to pick any of your created Facets and display them on a page for filtering. This is best paired with the Resources Grid widget. Filter Controls To first use this widget you need to setup various controls inside the widget. The […]
Resources Type Archive
While logged in, navigate to any Resource Type Archive page and click “Customizer” on the top admin bar. This will bring up the Customizer settings on the left with the view of the Resources Type Archive page on the right. As you change the settings inside the Customizer, the right side will refresh so you […]
Resources Cards
The Resources Cards refer to the way resources are displayed in the grid. If you are using a Resource Archive template besides the Theme Default option, you will see the cards on your Resources Archive. Additionally, on a Single Resource view if you have the “Related Posts” widget turned on you will see the cards […]
Resources Single
While logged in, navigate to the any individual Resource and click “Customizer” on the top admin bar. This will bring up the Customizer settings on the left with the view of the single Resource page on the right. As you change the settings inside the Customizer, the right side will refresh so you can visualize […]
Resources Archive
While logged in, navigate to the main Resources page and click “Customizer” on the top admin bar. This will bring up the Customizer settings on the left with the view of the Resources page on the right. As you change the settings inside the Customizer, the right side will refresh so you can visualize the […]